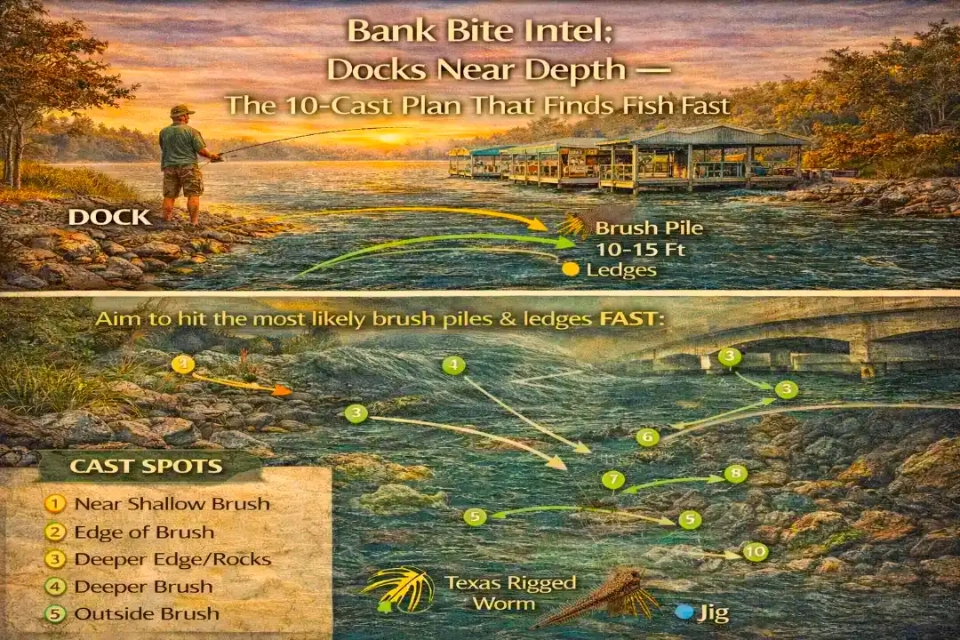
The 10-Cast Plan That Finds Fish Fast
Docks quietly produced some of the best bank bites across South Carolina and North Carolina this week, but only when they were positioned near real depth. Random shoreline docks with shallow water underneath were mostly empty, while docks sitting next to a drop, channel edge, or deeper basin consistently held bass and panfish — and occasionally catfish cruising the edges.
This article is built for bank anglers who want efficiency. Instead of spraying casts at every dock, this 10-cast plan shows exactly where to throw, in what order, and when to leave so you can find fish fast without burning time.
What you’ll learn in this article:
- How to identify a “dock near depth” from the bank
- The exact 10-cast sequence that finds fish quickly
- Where bass, panfish, and catfish position around docks
- Which casts to skip entirely
- When to move on versus slow down
1. What Makes a Dock Worth Fishing From the Bank
Not all docks are equal. The docks that produced this week shared one key trait: nearby depth within easy casting range. Fish used these docks as shade and ambush cover, but they positioned where the dock intersected with a depth change rather than sitting randomly underneath it.
Use this table to quickly decide whether a dock deserves your time.
Table: Bank-Qualified Dock Checklist
| Dock feature | Why it matters | What to look for from shore |
|---|---|---|
| Near a drop | Fish hold just off depth | Darker water line |
| Long walkway | Reaches deeper water | Posts extending far out |
| Floating dock | Maintains depth | Consistent shade |
| End section | Closest to depth | Corner furthest from shore |
| Nearby cover | Stacks fish | Brush, rock, or points |
If you can’t identify depth or a transition near the dock, your odds drop fast.
Tip: If you’re torn between two docks, choose the one whose end reaches the darkest water.
2. Casts #1–3: Outside Corners First
The outside corners of a dock are the highest-percentage targets because they sit closest to deeper water and give fish an easy ambush lane. These casts often tell you within minutes whether fish are present.
Use this table to make your first three casts count.
Table: Casts #1–3 — Outside Corners
| Target | Casting angle | Best bait | What you’re checking |
|---|---|---|---|
| Deep corner | Parallel | Jig | Holding fish |
| Down-current corner | Slight angle | Texas rig | Ambush lane |
| Windward corner | With wind | Spinnerbait | Active fish |
| Panfish edge | Vertical drop | Small jig | Grouped bites |
| Catfish path | Stationary | Cut bait | Cruisers |
If you get a bite here, slow down immediately and prepare to work the dock thoroughly.
Tip: If you’re torn on which corner to fish first, start with the one closest to deeper water.
3. Casts #4–6: Walk the Shade Line
If the corners don’t produce, the next step is the shade line created by the dock. Fish often position right where light meets shadow, especially in clear or calm conditions.
This table shows how to work the shade efficiently.
Table: Casts #4–6 — Shade Line Pass
| Shade zone | Casting angle | Best bait | Retrieve focus |
|---|---|---|---|
| Hard shade edge | Parallel | Finesse worm | Slow drag |
| Mid-shade | Slight angle | Jig | Bottom contact |
| Bright-to-dark line | Cross-cast | Jerkbait | Pause on edge |
| Panfish pocket | Vertical | Small jig | Hover |
| Calm water | Long cast | Dropshot | Minimal movement |
Most shade-line bites came on the edge, not deep underneath the dock.
Tip: If you’re torn on speed in the shade, slow down — fish use shade to rest, not chase.
4. Casts #7–9: Under-Dock or Walkway Posts
Once the edges are checked, it’s time to probe the posts and walkways that intersect deeper water. These targets often hold fish that won’t move far to feed.
Use this table to finish the dock efficiently.
Table: Casts #7–9 — Post & Walkway Targets
| Target | Why it works | Best bait |
|---|---|---|
| Walkway posts | Vertical cover | Jig |
| End post | Closest to depth | Texas rig |
| Floating dock underside | Consistent shade | Finesse worm |
| Panfish cover | Shelter | Small jig |
| Catfish route | Travel lane | Cut bait |
These casts often produce slower, heavier bites rather than aggressive strikes.
Tip: If you’re torn between skipping far under the dock or fishing the posts, fish the posts first — they’re easier and higher percentage.
5. Cast #10: Decision Cast (Stay or Go)
The final cast is your decision-maker. It tells you whether to stay and slow down or move to the next dock. This keeps the plan efficient and prevents over-fishing empty water.
Use this table to make the call.
Table: Cast #10 — Decision Check
| Result | Meaning | Next move |
|---|---|---|
| Solid bite | Fish present | Slow down |
| Short strike | Hesitant fish | Downsize |
| Follower | Curious fish | Repeat angles |
| No response | Dock empty | Move on |
| One random bite | Small group | Re-run plan |
This final cast keeps emotion out of the decision and protects your time.
Tip: If you’re torn about staying longer, re-run the first three casts once before leaving.
How to Use This Info on Your Next Trip
Fishing docks from the bank doesn’t require dozens of casts — it requires the right ten. By prioritizing corners, shade lines, and posts near depth, bank anglers in SC and NC consistently found fish without wasting time.
Follow the 10-cast plan, let the dock tell you if fish are home, and move with confidence when it doesn’t.
Your Next 3 Moves
- Start here: Pick a dock that reaches dark water (near depth) and start with outside corners—those are the fastest “yes/no” casts.
- Adjust like this: If corners are quiet, walk the shade line next and slow down on the edge where light meets shadow.
- Move if needed: If the dock doesn’t answer after the 10-cast sequence, move to the next dock with the same depth setup and repeat—don’t camp on empty wood.
